Friday, September 28, 2012

Frixion Pens


This might seem like an odd thing to find on a sewing blog, but these pens have seriously changed my sewing! They're called Pilot FriXion Pens and the reason they're awesome is you can write on material, sew or embroider, then iron the material and the heat from the iron will remove the ink!


I love using these when I make my Flying Geese because it's so much easier to mark with the pen, sew and the ink is gone when you iron the layers apart.


I also used these to mark my square quilting on my Quilted Zipper Bags. The only challenge with these pens is if you use it on dark material (like the bottom of the Quilted Zipper Bags) it can fade the material a little. It's not enough for me to care, but I would test them on darker material before I used them.

Sometimes you can find these at the office supply store, but I bought mine through Amazon.com. You can buy a pack of just black ones or colored ones. I like having the color ones so I can use it on different materials. So pick some up and try them out! They'll change the way you mark your material.

Wednesday, September 26, 2012

Beanbag Nativity


Last year I made Logan a beanbag Nativity set for Christmas. I wanted him to be able to play with the Nativity set without me worrying he would destroy something glass. He was only 5 months old last year, so he pretty much just chewed on them, but this year he's already started playing with them.


So why am I working on them again? Well, two friends are paying me to make Nativity sets for them, so I'm doing my best to get these done before the Christmas decorations go up! I'm planning on making two more (just Mary, Joseph, and Jesus) for gifts.

If you're interested in buying a full set, I'll custom make you one for $30 plus shipping.  Or Mary, Joseph, and Jesus for $15. Just let me know soon, so I have time to finish it before the holidays!


Monday, September 24, 2012

Sippy Cup Leash (free tutorial)

We went on a road trip last weekend to Zion's National Park. Since this was the first time going with Logan weaned, I decided to whip up a sippy cup leash to make the car ride a little more smooth. These things are great though, you can use them on your stroller, car seat, anything that you can slip this lease over! This tutorial works best for a sippy cup that has contour to it (like ours has an hour glass figure).

Supplies:
1 piece of elastic 9 inches long (1 inch wide)
1 piece of ribbon 28 inches long (1 inch wide)


Using a lighter, melt the end of the elastic. Don't light it on fire, just barely singe the ends so it melts together and won't fray. Since I opted for cotton ribbon, I used nail polish to stop the end from fraying.


Wrap the elastic around your sippy cup and mark with your thumb where the cup ends.


Pull the elastic off the cup, and mark where your thumb is with a pin.


Lay your elastic down, line your ribbon up with your pin, and place your elastic on top of the ribbon. You're sandwiching the ribbon between the two ends of the elastic.


 Pin all three pieces together. Make sure the ends of your elastic line up, and try to center the pin.


Zigzag first across the top edge of the elastic. Remove the pin and zigzag along the top edge of the ribbon. Put a few stitches in between the sewing to make sure this holds. I then painted the zigzags (front and back) with nail polish to give the sewing extra strength and to keep it from fraying.


Now, on the opposite end of the leash, fold the ribbon over 1/4 of an inch. then fold that down 3 1/2 inches. Pin the ribbon down.


Sew up and down the edge twice to hold the loop in place.


Just loop this leash around the strap of a car seat, stroller, highchair, or anything with a strap for easy drinking and no loosing that sippy cup!


Friday, September 21, 2012

Quilting Table (free tutorial)


When you machine quilt the top of a quilt, it's helpful to have a quilting table. This allows you more space to maneuver the material, as well as keeps the weight of your material from messing up your stitch length. 


My mom has a lovely one that was made for her machine and cost her $100... Since I knew we couldn't afford that, I decided I could make my own!

Now I know you might not be a gifted woodworker, but this project really isn't as hard as it sounds. With the help of my husband, this was completed in a few hours and only cost us $8. Pretty good if you consider the alternative.

Supplies:
Wood (22 x 24)
Wooden Dowel (3/4 inch diameter)
Grippy shelf or drawer liner
Wood Glue
Shoe Goo

I found a piece of fake shelving in our garage that had a lovely lip already placed on it. It measured 22 inches wide and much longer than we needed. So I cut it down to 24 inches (finishing 22 x 24).

I then measured the shape and size of my machine, and had my husband cut out that shape with a jigsaw. I rounded the corners, since my machine has rounded edges.

Then we flipped over the board, drilled 1/4 inches down into the wood with a 3/4 drill bit. This size matched the size of the dowels I chose to use. finally I measured the height I would need the table to be, subtracted the height of the wood board, and cut the dowels the remaining height.


I glued the dowels into the holes (using wood glue). Then I stuck a piece of that drawer liner grippy stuff on the bottom of the dowel (using shoe glue, but any glue should work).

We let it all dry over night, and VOLA! I have a cool new table. It has worked great for machine quilting.


Wednesday, September 19, 2012

Square in a Square


I've been working on a few more quilting squares today! They mostly consist of the Square in a Square, so I wanted to detail how easy the process is. The squares I did will be 2 inches finished. I cut out (1) 1 7/8 square for the center and (2) 2 2 1/4 inch squares cut diagonally to make triangles.


After you've cut out your pieces, line two of the triangles up on top of the squares (wrong sides out). Using a 1/4 inch seam allowance, sew each triangle onto the square.


Iron the triangles out, with the seams ironed away from the square.


Pin the last two triangles onto the square on the last two sides. One trick I use to center the triangles perfectly is to make sure the little triangles the big triangle makes in the corners are the same size. If they look identical, you know your big triangle is centered.


Press the final sides out. make sure you press the front and the back.


Trim your Square in a square so it measures 2 1/2 inches. The easiest way for me to do this is to line the corners of the square up with the 1/4 inch line on my ruler and cut from there. Since you know you will have a 1/4 inch seam allowance, this should center your square perfectly.


Add your pieces to your finished block! The one below is the Johnny Around the Corner square.


Monday, September 17, 2012

Crayon Roll (free tutorial)


3 weeks ago my son, Logan, started enjoying coloring! We've tried coloring over and over for the past 6 months, and it finally stuck. So I decided to make him a crayon roll to take with us. This way when we go to Grandma's or church, we have easy access to crayons.

Supplies:
3 pieces of material (5 x 13 inches)
          1 lining, 1 pocket, 1 outside
1 piece of warm & natural batting (5 x 13)
1 piece of ribbon 24 inches long

I recommend using a different color of material for the lining than the pocket. That way it's easy for the kid using the roll to see where to put the crayon in.


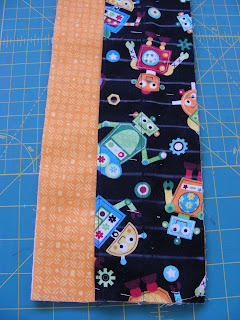
First, take the pocket piece and fold it in half. Slide the top half up 1 1/2 inches up. Pin down the material and press. Sew along the top edge, 1/8 inch from the fold. Fold the bottom, short end of the material over 1/4 of an inch and sew 1/8 an inch from the edge.


Lay the batting down, followed by the lining, followed by the pocket (with good sides up). Pin the ends down, and mark a strait line 1 1/4 inch from the end. Then mark a strait line 3/4 of an inch from that line and continue until you reach the end of the roll. The last line should be approximately 1 1/4 inch from the end.

Sew on these lines making sure to back stitch at the top of the pocket. This will keep the roll from coming apart.


Pin the ribbon in place right in the middle of the roll on the right side. Sew 1/8 of an inch from the edge. Backstitch a few times to keep the ribbon secure. Pin the long tail of the ribbon inside of the roll so it won't get sewn over on the next step.


Place the back material on top of the inside and pin down. Sew along the edge of the material, leaving a 3 inch gap to flip the material the right direction.


Cut the corners off to ensure the flipping process will run smoothly. Flip everything the right way. Press the material. Make sure you press the material that isn't sewn (where you flipped the material).


Sew 1/8 inch from the edge of the material all the way around.


 Put your crayons into the roll and roll it up. This would make a fun birthday or Christmas gift. It only took me an hour to make (including ironing and cutting the material), so it's not really labor intensive.

Enjoy!

Friday, September 14, 2012

Perfectly Bound Quilt Corners


This should really be FINISHING FRIDAY! I finished my autumn quilt and the Halloween table runner! It took a lot of time and work, but it was all worth it to have these done in time to use them this year.


I want to highlight the way I bind my quilts. It may take a little longer than the way I was taught to do it, but the results are perfect corners. You pin only one side at a time, which makes all the difference.


First, pin down the entire first side, and mark a line at a 45 degree angle going from the corner outward at least a quarter of an inch. You then sew a quarter inch from the edge and when you hit the diagonal angle follow that down and off the material. If anything, you can sew a little prior to the line.


Fold the excess binding away from the quilt. make sure the binding lines up even with the next side we will be working on. You can pin the binding down parallel to the 45 degree angle to help hold it in place. Then fold the binding back down, laying it right on top of your quilt. Pin the next side down. Sew, starting a quarter inch away from the edge. Repeat until the quilt is bound.


When you finish off your quilt, you will get a perfect mitered edge. It may take a little longer to make these than usual, but the results are well worth the time!

Wednesday, September 12, 2012

Autumn Quilt

I've been working on an autumn quilt for over a year. It's the quilt I was making in my quilting class that started last July. It's finally almost done! Today I'm working on finishing machine quilting it. It's taken a lot of time and work, and I'm so glad it's (almost) done so I can enjoy it this fall!


This is the top half of the quilt. The leaves weren't in the original, this is where the applique design from last week was supposed to go.


This is the bottom half of the quilt. I've machine quilted all but the pumpkins. That's all that needs to be finished to complete this project! Hopefully I can show you the finished product on Friday!